A Practical Guide to Ruby Web Scraping
- Nov 19, 2025
- 13 min read
Ruby has a well-deserved reputation for being a pleasure to work with, and that philosophy extends beautifully to web scraping. At its core, scraping with Ruby is about using the language's clean, intuitive syntax and a fantastic set of libraries to pull data from websites automatically. It's all about writing readable code that gets the job done without unnecessary complexity.
This focus on developer happiness means you can build and test your scrapers quickly, letting you focus on the data you need to extract rather than getting bogged down in boilerplate code.
Why Ruby Is a Smart Choice for Web Scraping
When you're starting a new web scraping project, the language you pick makes a real difference. Python often gets the spotlight, but Ruby has carved out its own niche, particularly for developers who value pragmatism and speed. It’s built to make your life easier, which is exactly what you want when you're trying to build a reliable scraper.
The secret sauce behind ruby web scraping is its ecosystem of libraries, known as "gems." These gems are ready-made toolkits that handle the heavy lifting. Instead of writing code from scratch to manage HTTP connections or parse messy HTML, you can just plug in a gem and get right to the good stuff—the data.
The Power of Ruby Gems
The Ruby community has built some truly world-class tools for this kind of work. Gems like Nokogiri are the industry standard for parsing HTML and XML, letting you pinpoint the exact data you need with simple CSS selectors. For actually fetching the web pages, a gem like HTTParty makes sending web requests feel incredibly simple.
This powerful combination means your scripts are not only effective but also remarkably clear and concise. It’s not uncommon to build a fully functional scraper in just a handful of lines, which speaks volumes about Ruby's design philosophy.
The real win with Ruby is how it lowers your cognitive load. You're not wrestling with syntax; you're focused on the logic of your scraper. This makes it a go-to choice for everything from quick, one-off jobs to complex, mission-critical data pipelines.
Standing Out in a Crowded Field
While Python certainly dominates in the data science space, Ruby’s elegant syntax makes it a strong contender for web scraping. For developers who appreciate writing clean, object-oriented code, building a scraper in Ruby often just feels right.
Ruby's key scraping libraries are mature, battle-tested, and actively maintained. Take Nokogiri, for example—it pulls in over 20 million downloads per month. That's a massive vote of confidence from the developer community, showing just how reliable and essential it is. If you're curious about how this compares to other popular languages, you can see a different approach in our guide on scraping a website with Python.
Setting Up Your Scraping Environment
Getting off on the right foot can save you hours of debugging later. You need a place where gems live in isolation, so one project doesn’t interfere with another. That’s where combining rbenv for Ruby versions with bundler for dependency management really shines.
Open your terminal and run:
mkdir ruby_scrapercd ruby_scraper
This directory becomes your sandbox — a self-contained setup that stays predictable. Trust me, that little bit of organization is gold when those version conflicts show up.
Managing Ruby Versions And Dependencies
One of the most frustrating mistakes is running your code on a different Ruby release than you tested. While RVM is popular, I prefer rbenv for its simplicity and speed. After installing it, switch to the Ruby version your project needs.
Next, it’s time to list the libraries your scraper relies on. Bundler makes that painless. Inside your project folder, initialize a fresh Gemfile:
bundle init
In the newly created Gemfile, include the core gems for almost every scraper I build:
HTTParty to make HTTP requests and follow redirects
Nokogiri for parsing HTML and extracting elements
Pry as an interactive console to troubleshoot code on the fly
Your Gemfile will look like this:
frozen_string_literal: true
source "https://rubygems.org"
gem "httparty"gem "nokogiri"gem "pry"
Embedding in your scraper is a lifesaver when you need to inspect variables or test selectors in real time.
Finally, lock in those dependencies:
bundle install
This fetches each gem and builds a Gemfile.lock, which pins exact versions. With your environment set and dependencies locked, you’ve built a rock-solid foundation for building and sharing reliable scrapers. From here, you can tackle JavaScript-heavy sites or set up proxies without worrying about your core setup shifting beneath your feet.
Scraping a Static Website with Nokogiri

When you're getting started with Ruby web scraping, static sites are the perfect training ground. They’re predictable. The content is right there in the initial HTML, with no JavaScript tricks to worry about. This is where the classic combination of HTTParty and Nokogiri really shines.
Think of it as a two-step dance. HTTParty goes out and grabs the raw HTML from a URL, and Nokogiri steps in to slice it up, letting you pinpoint exactly what you need—product titles, prices, blog post headlines, you name it. For a simple product catalog or an online publication, this duo gets the job done with clean, readable code.
Getting set up is straightforward:
First, make sure you have the HTTParty and Nokogiri gems installed.
Then, you’ll write a quick script to fetch the page content using .
Finally, you pass that raw HTML into to start digging through the document.
Here’s what that looks like in practice:require 'httparty'require 'nokogiri'
Grab the page
response = HTTParty.get('https://example.com/products')
Give the HTML to Nokogiri to parse
doc = Nokogiri::HTML(response.body)
Fetching HTML with HTTParty
HTTParty makes the "getting the page" part incredibly simple. It’s designed to handle the common headaches for you, like automatically following redirects or throwing a clear error if a request times out. This means less time writing boilerplate code and more time focusing on the data.
One of the most important features is how easy it is to customize request headers. You can, and should, set a User-Agent string that mimics a real web browser. This single change can drastically reduce your chances of getting blocked right out of the gate.
A few more reasons I always reach for HTTParty first:
Headers: You can customize anything you need to make your requests look legitimate.
Timeouts: Setting a timeout prevents your script from hanging indefinitely on a slow-loading page.
Built-in parsing: While we’re using it for HTML, it can also automatically parse JSON and XML if the server returns them.
A realistic User-Agent header can boost your scraper’s success rate by up to 30% in some scenarios. It's one of the easiest wins you can get.
Parsing HTML with CSS Selectors
Once you have the HTML document loaded into a Nokogiri object, it’s time to find your data. Nokogiri lets you navigate the document tree using CSS selectors or XPath queries, but most developers find CSS selectors far more intuitive. They look and feel just like the selectors you’d write in a stylesheet.
For example, finding all the post titles on a blog is as simple as:titles = doc.css('.post-title').map(&:text)The two key methods you'll use constantly are and . Use when you expect to find multiple elements (like a list of products) and when you only need the very first match (like the main H1 heading of a page). This flexibility is what makes parsing so powerful.
returns a (which acts like an array) of all matching elements.
returns the first matching element directly, or if nothing is found.
Once you have an element, you can use methods like to get its content or to grab an attribute value.
Organizing Extracted Data
Pulling out raw text is great, but it’s not very useful until you give it some structure. The most common and effective pattern is to organize your scraped data into an array of hashes. Each hash represents a single record (like a product), with keys for each piece of data you extracted (like and ).
Here’s how you could structure data from a product listing page:products = doc.css('.product').map do |item| { title: item.at_css('.name')&.text, price: item.at_css('.price')&.text }endWorking this way gives you a few major advantages:
The data is ready to be converted into formats like CSV or JSON.
It creates a clear, readable mapping between the scraped fields and your data keys.
If you need to debug, you can inspect individual hashes to see exactly what was (or wasn't) found.
A tidy data structure is the backbone of any scalable scraper. It separates the scraping logic from the data processing and makes everything easier to maintain.
Monitoring and Debugging
Don't be surprised when your scraper suddenly breaks. Websites change all the time—a class name gets updated, the layout shifts, and your selectors no longer find anything. That's just part of the game.
The key is to anticipate it. Log your HTTP status codes and any errors that occur during parsing. A simple table of common issues can help you diagnose problems much faster.
Error Type | Possible Cause | Tip |
|---|---|---|
404 Not Found | The URL is wrong or the page was removed. | Double-check your target URLs. |
500 Server Error | The website's server is having a problem. | Implement a retry mechanism with a delay. |
TimeoutError | The server is too slow to respond. | Increase the timeout setting in HTTParty. |
When you start seeing values in your data, it's almost always a sign that a CSS selector needs to be updated. Open the page in your browser's developer tools and inspect the element to find the new selector.
Exporting Data
Once you have your clean array of hashes, getting it into a usable file format is the final step. Ruby’s standard libraries make this incredibly easy for both CSV and JSON.
For a CSV file, you can use the built-in library:require 'csv'
CSV.open('data.csv', 'w') do |csv|
Add the header row
csv << ['Title', 'Price']
Add the data
products.each { |p| csv << [p[:title], p[:price]] }endAnd creating a JSON file is just as simple:require 'json'
File.write('data.json', JSON.pretty_generate(products))And that’s really all there is to the fundamentals of static scraping.
Before you go, here are a few final tips to keep your scrapers running smoothly:
Check : Always respect the site's scraping policies.
Be polite: Add random delays between requests to avoid hammering the server.
Rotate User-Agents: Don't use the same User-Agent string for every single request.
Validate your data: After a scrape finishes, check for empty fields or unexpected values. It's the quickest way to spot a broken scraper.
Happy scraping
Tackling Modern JavaScript-Driven Websites
When you visit a page that loads most of its content after the initial HTML arrives, a simple HTTP fetch won’t cut it. Traditional tools like HTTParty and Nokogiri only grab the raw HTML payload—leaving out anything rendered by JavaScript.
In Ruby web scraping, it’s common to bump into sites that rely on client-side scripts to build out their interface. From endless-scroll product listings to interactive data dashboards, you’ll need more than a basic parser. You have to drive the page just as a user would.
Before diving into browser automation, let’s weigh the two main approaches:
Static vs Dynamic Scraping ApproachesA comparative overview to help you decide which scraping method is right for your target website.
Technique | Tool | Pros | Cons |
|---|---|---|---|
Static Scraping | HTTParty + Nokogiri | Fast and lightweight; minimal dependencies | Cannot process JavaScript callbacks |
Dynamic Scraping | Watir or Selenium | Handles interactive elements; sees complete DOM | Slower and more resource-intensive |
Headless Browser | Watir (Headless Mode) | Runs without opening a window; great for automation pipelines | Harder to debug without a visible UI |
This side-by-side should clarify which route fits your target site best.
Introducing Browser Automation With Watir
To capture JavaScript-injected content, you’ll need a browser under script control. Enter Watir, a Ruby gem that spins up Chrome or Firefox, navigates to your URL, and then waits for the page to finish its client-side routines.
Once the browser is live, your script can mimic real user actions:
Click “Load More” buttons to reveal extra items
Scroll down to trigger lazy-loaded images and data
Pause until a specific element (price tag, chart, etc.) appears
By automating a real browser, your scraper sees the page exactly as a human does. That’s the secret to unlocking data from modern, JavaScript-heavy applications.
A Practical Scenario Scraping Dynamic Content
Suppose you need all the product reviews on a page, but they only appear after pressing “Show Reviews.” A static request never fires that click event, so you never see the reviews.
With Watir, the flow looks like this:
Navigate: Direct the browser to the product’s URL.
Wait And Locate: Pause until the “Show Reviews” button enters the DOM.
Interact: Programmatically click that button.
Wait For Content: Hold on until the review section becomes visible.
Scrape: Hand the fully rendered HTML back to Nokogiri for parsing.
This method may run a bit slower and consume more memory than a plain HTTP fetch, but it’s often the only reliable way to gather data from complex, script-driven pages. Tools like Watir and Selenium belong in every serious scraper’s toolbox. For a deeper look at similar automation frameworks in other languages, check out our guide comparing Puppeteer vs. Playwright.
Building More Robust and Respectful Scrapers
Getting the data is just the start. The real mark of a professional scraper is how reliable, considerate, and resilient it is when faced with the web's defenses. To move past simple scripts, you need to build scrapers that run smoothly and don’t cause headaches for the sites you’re visiting.
This is all about shifting your mindset. Websites are always on the lookout for aggressive, bot-like activity. Hammering a server with a constant stream of requests is the quickest way to get your IP address banned. The trick is to make your scraper act more like a human, which means slowing down and adding some variability.
Practicing Ethical Scraping Techniques
The first step to building a better bot is to stop it from announcing itself as one. Most HTTP libraries use a generic User-Agent string that basically screams "I'm a script!" A simple but surprisingly effective fix is to set a custom User-Agent that looks like it's coming from a popular web browser.
Next, you have to pump the brakes. Don't just let your script fire off requests as fast as it can. That puts a real strain on the target server. A tiny bit of code like between your requests introduces a random, human-like pause that makes your scraper far less disruptive.
Being a good internet citizen isn't just about being nice; it's a practical strategy. A scraper that respects a site's limits is a scraper that doesn't get blocked. That means more reliable data for you in the long run.
For a deeper dive into these and other essential guidelines, check out our guide on 10 web scraping best practices for developers.
Navigating Anti-Scraping Defenses
Even if you're polite, you'll eventually run into more sophisticated anti-bot systems. Many sites will automatically block an IP after it hits a certain request threshold in a short time. This is exactly where proxies become a necessity.
A proxy server is just an intermediary that routes your requests through a different IP address. By using a pool of proxies and rotating through them, you can spread your requests out across many different IPs, making it much tougher for a website to single out and block your activity.
Residential Proxies: These are top-tier. Since the IPs come from real internet service providers, they look like traffic from everyday users. They're highly effective but come at a higher cost.
Datacenter Proxies: These are your workhorses—fast, affordable, and sourced from data centers. The trade-off is that they're often easier for websites to spot and block.
When dealing with a dynamic site, the scraping flow has a crucial intermediate step: the browser has to render all the JavaScript before you can scrape the final content.
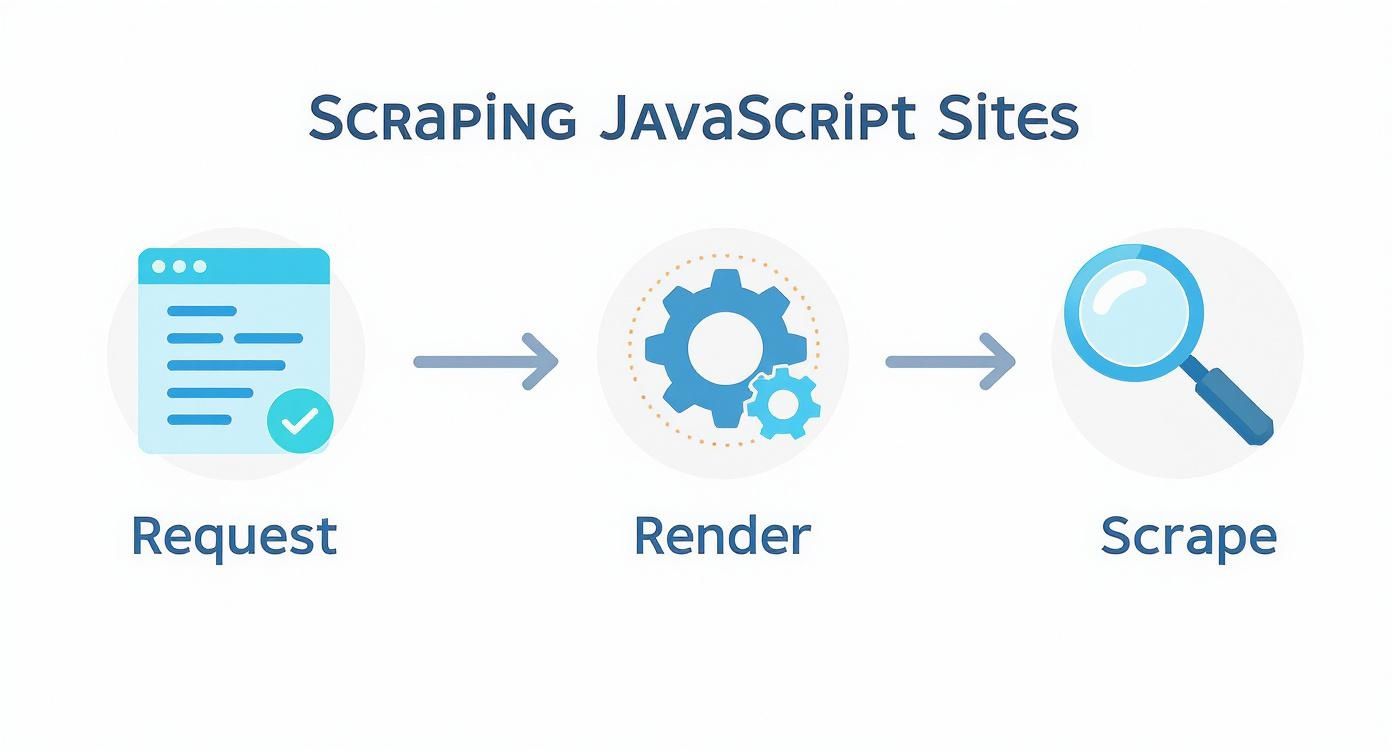
This visual really drives home why tools like Watir or Selenium are indispensable—they let your script see the same fully-loaded page a human user does.
Implementing Proactive Error Handling
Sooner or later, your scraper will run into errors. It's a fact of life. Websites change their layouts, networks go down, and sometimes a page just returns a weird status code. If you haven't planned for this, any one of these issues can crash your script and bring everything to a halt.
Building resilience means expecting things to fail. Wrap your HTTP requests in a block to catch common network problems like timeouts. This lets your script log the issue, take a breath, and try again instead of just giving up.
A truly robust scraper knows how to handle common HTTP status codes gracefully:
Retry on 5xx errors: Server errors (like 500 or 503) are usually temporary. Your script should be smart enough to wait a bit and retry.
Log 4xx errors: Client errors (like 404 Not Found or 403 Forbidden) mean something is wrong on your end. Log these URLs so you can investigate later.
Validate successful responses: Don't just assume a request worked. Always check for a 200 OK status before you even think about parsing the HTML.
By combining polite scraping tactics, proxy rotation, and smart error handling, you can transform a fragile script into a professional-grade tool that reliably gathers data, no matter what the web throws at it.
What to Do With Your Data: Storing and Organizing Your Scraped Results

Pulling raw data from a website is just the first step. The real value is unlocked when you organize that information into something clean, structured, and actually usable. A raw text dump won't get you very far.
Before you even think about saving a file, get your data organized internally. I've found the best approach is to structure everything as an array of hashes. Each hash in the array represents a single, complete record—like one product or one user profile—with keys for each piece of data you've scraped.
This structure is a perfect intermediate format. It's clean, easy to manipulate in Ruby, and can be effortlessly converted into different file types.
Exporting to a CSV File
For anything involving spreadsheets or data analysis, the Comma-Separated Values (CSV) format is your best friend. It's simple, universal, and incredibly lightweight. Luckily, Ruby has a fantastic built-in library that makes this process dead simple.
Here’s a quick example of how to dump an array of product hashes into a file:
require 'csv'
products = [ {title: "Cool Gadget", price: "$49.99"}, {title: "Amazing Widget", price: "$29.99"}]
Define the headers you want in your CSV
headers = ['Title', 'Price']
CSV.open('products.csv', 'w', write_headers: true, headers: headers) do |csv| products.each do |product| # Add a new row for each product hash csv << [product[:title], product[:price]] endend
This snippet creates the file, writes the header row automatically, and then loops through your array to add each one as a new row. It's clean and efficient.
Writing to a JSON File
If your scraped data is destined for a web application or an API, JSON (JavaScript Object Notation) is the way to go. It's the standard for data interchange on the web. And just like with CSVs, Ruby's built-in library has you covered.
The real power of a well-structured hash array is its versatility. With minimal effort, the same data structure can be serialized into multiple formats, from CSV for analysts to JSON for developers, without changing your core scraping logic.
Creating a JSON file from your data is even more straightforward:
require 'json'
products = [ {title: "Cool Gadget", price: "$49.99"}, {title: "Amazing Widget", price: "$29.99"}]
Write the array to a file as a nicely formatted JSON string
File.write('products.json', JSON.pretty_generate(products))
I almost always use . It adds indentation and line breaks, making the output file so much easier for a human to read and debug later. With these two methods, your data is primed and ready for whatever you plan to do with it next.
At ScrapeUnblocker, we handle the complexities of large-scale data extraction so you can focus on the data itself. Our platform manages rotating proxies, JavaScript rendering, and anti-bot systems, delivering clean data directly to you via a simple API call. Get started today at ScrapeUnblocker.
Comments